Feathered Valentines Day Card For Men

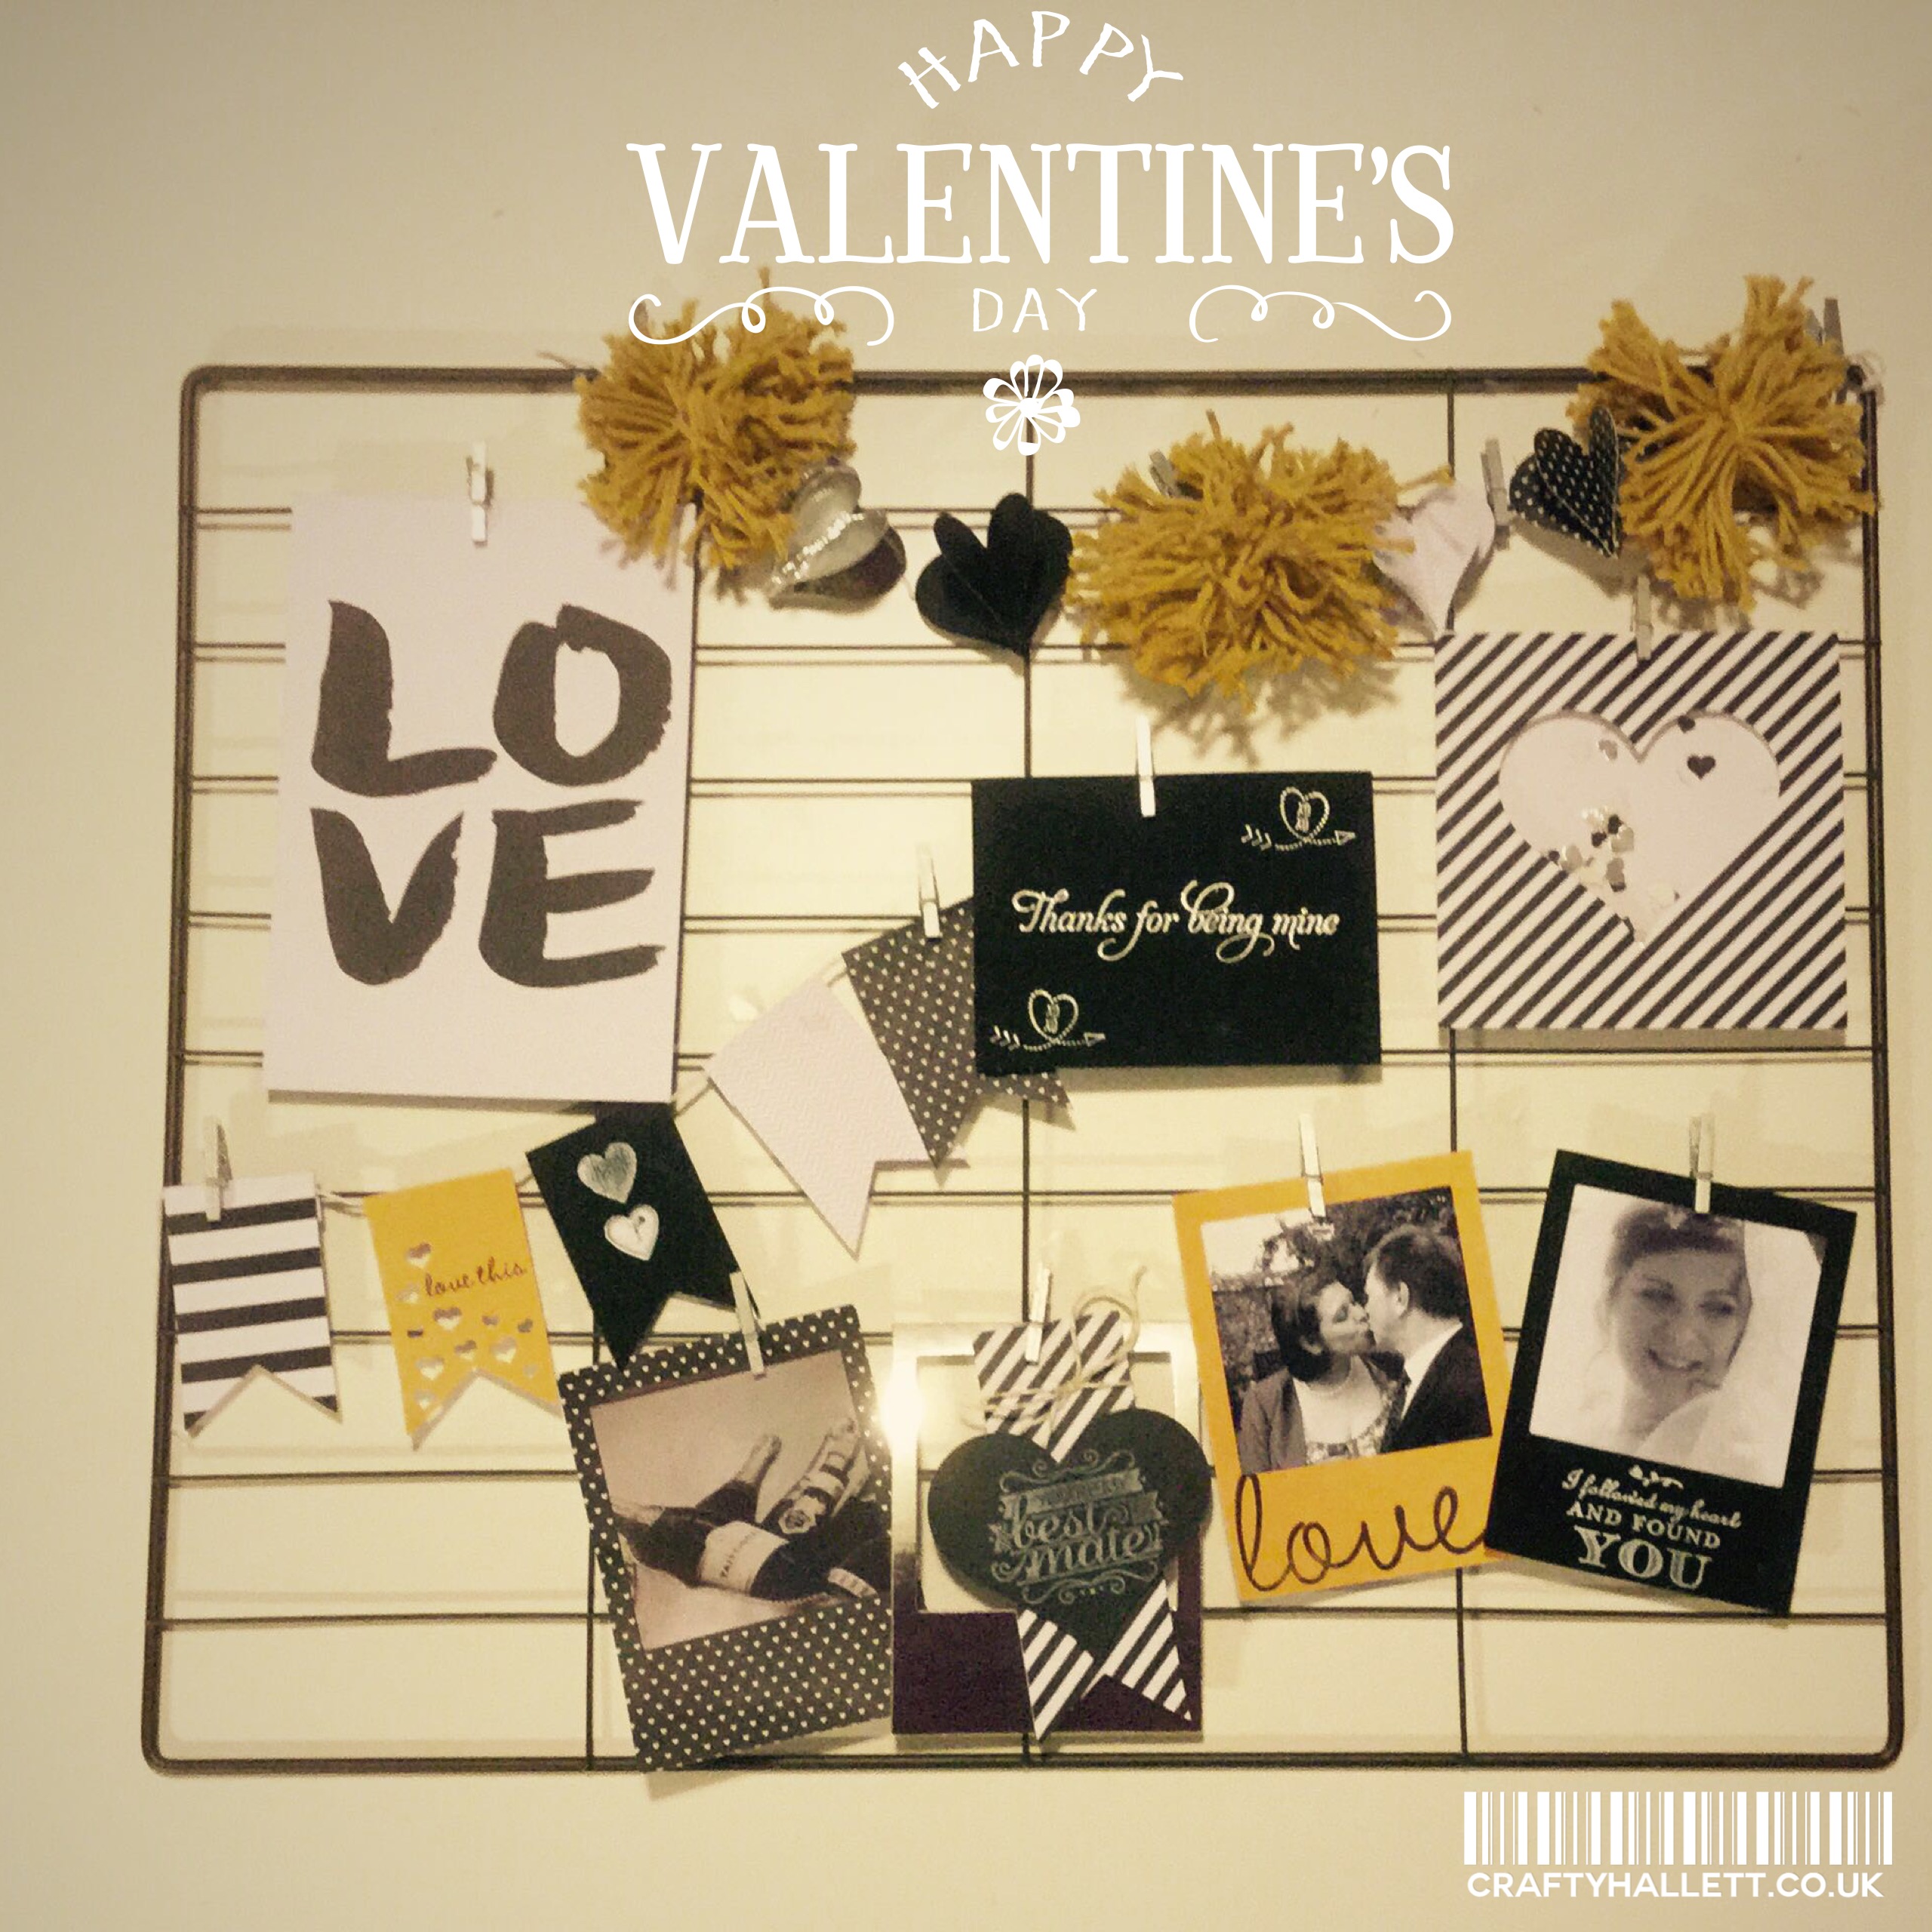
As an Independent Stampin Up! UK demonstrator we get to play with all sorts of fun products, including some lovely Pink and Red Valentines papers.  Which is lovely if you are in to making Pink and Red Valentines day cards, but what to do for the man in your life that isn’t overly girly… whilst still being a little bit romantic and slushy.  Well that’s the joy of having so many coordinating inks and papers and ribbons – we have something for everyone, and I came up with this card, (Mr Craftyhallett Look away now)….

washi tape feathers

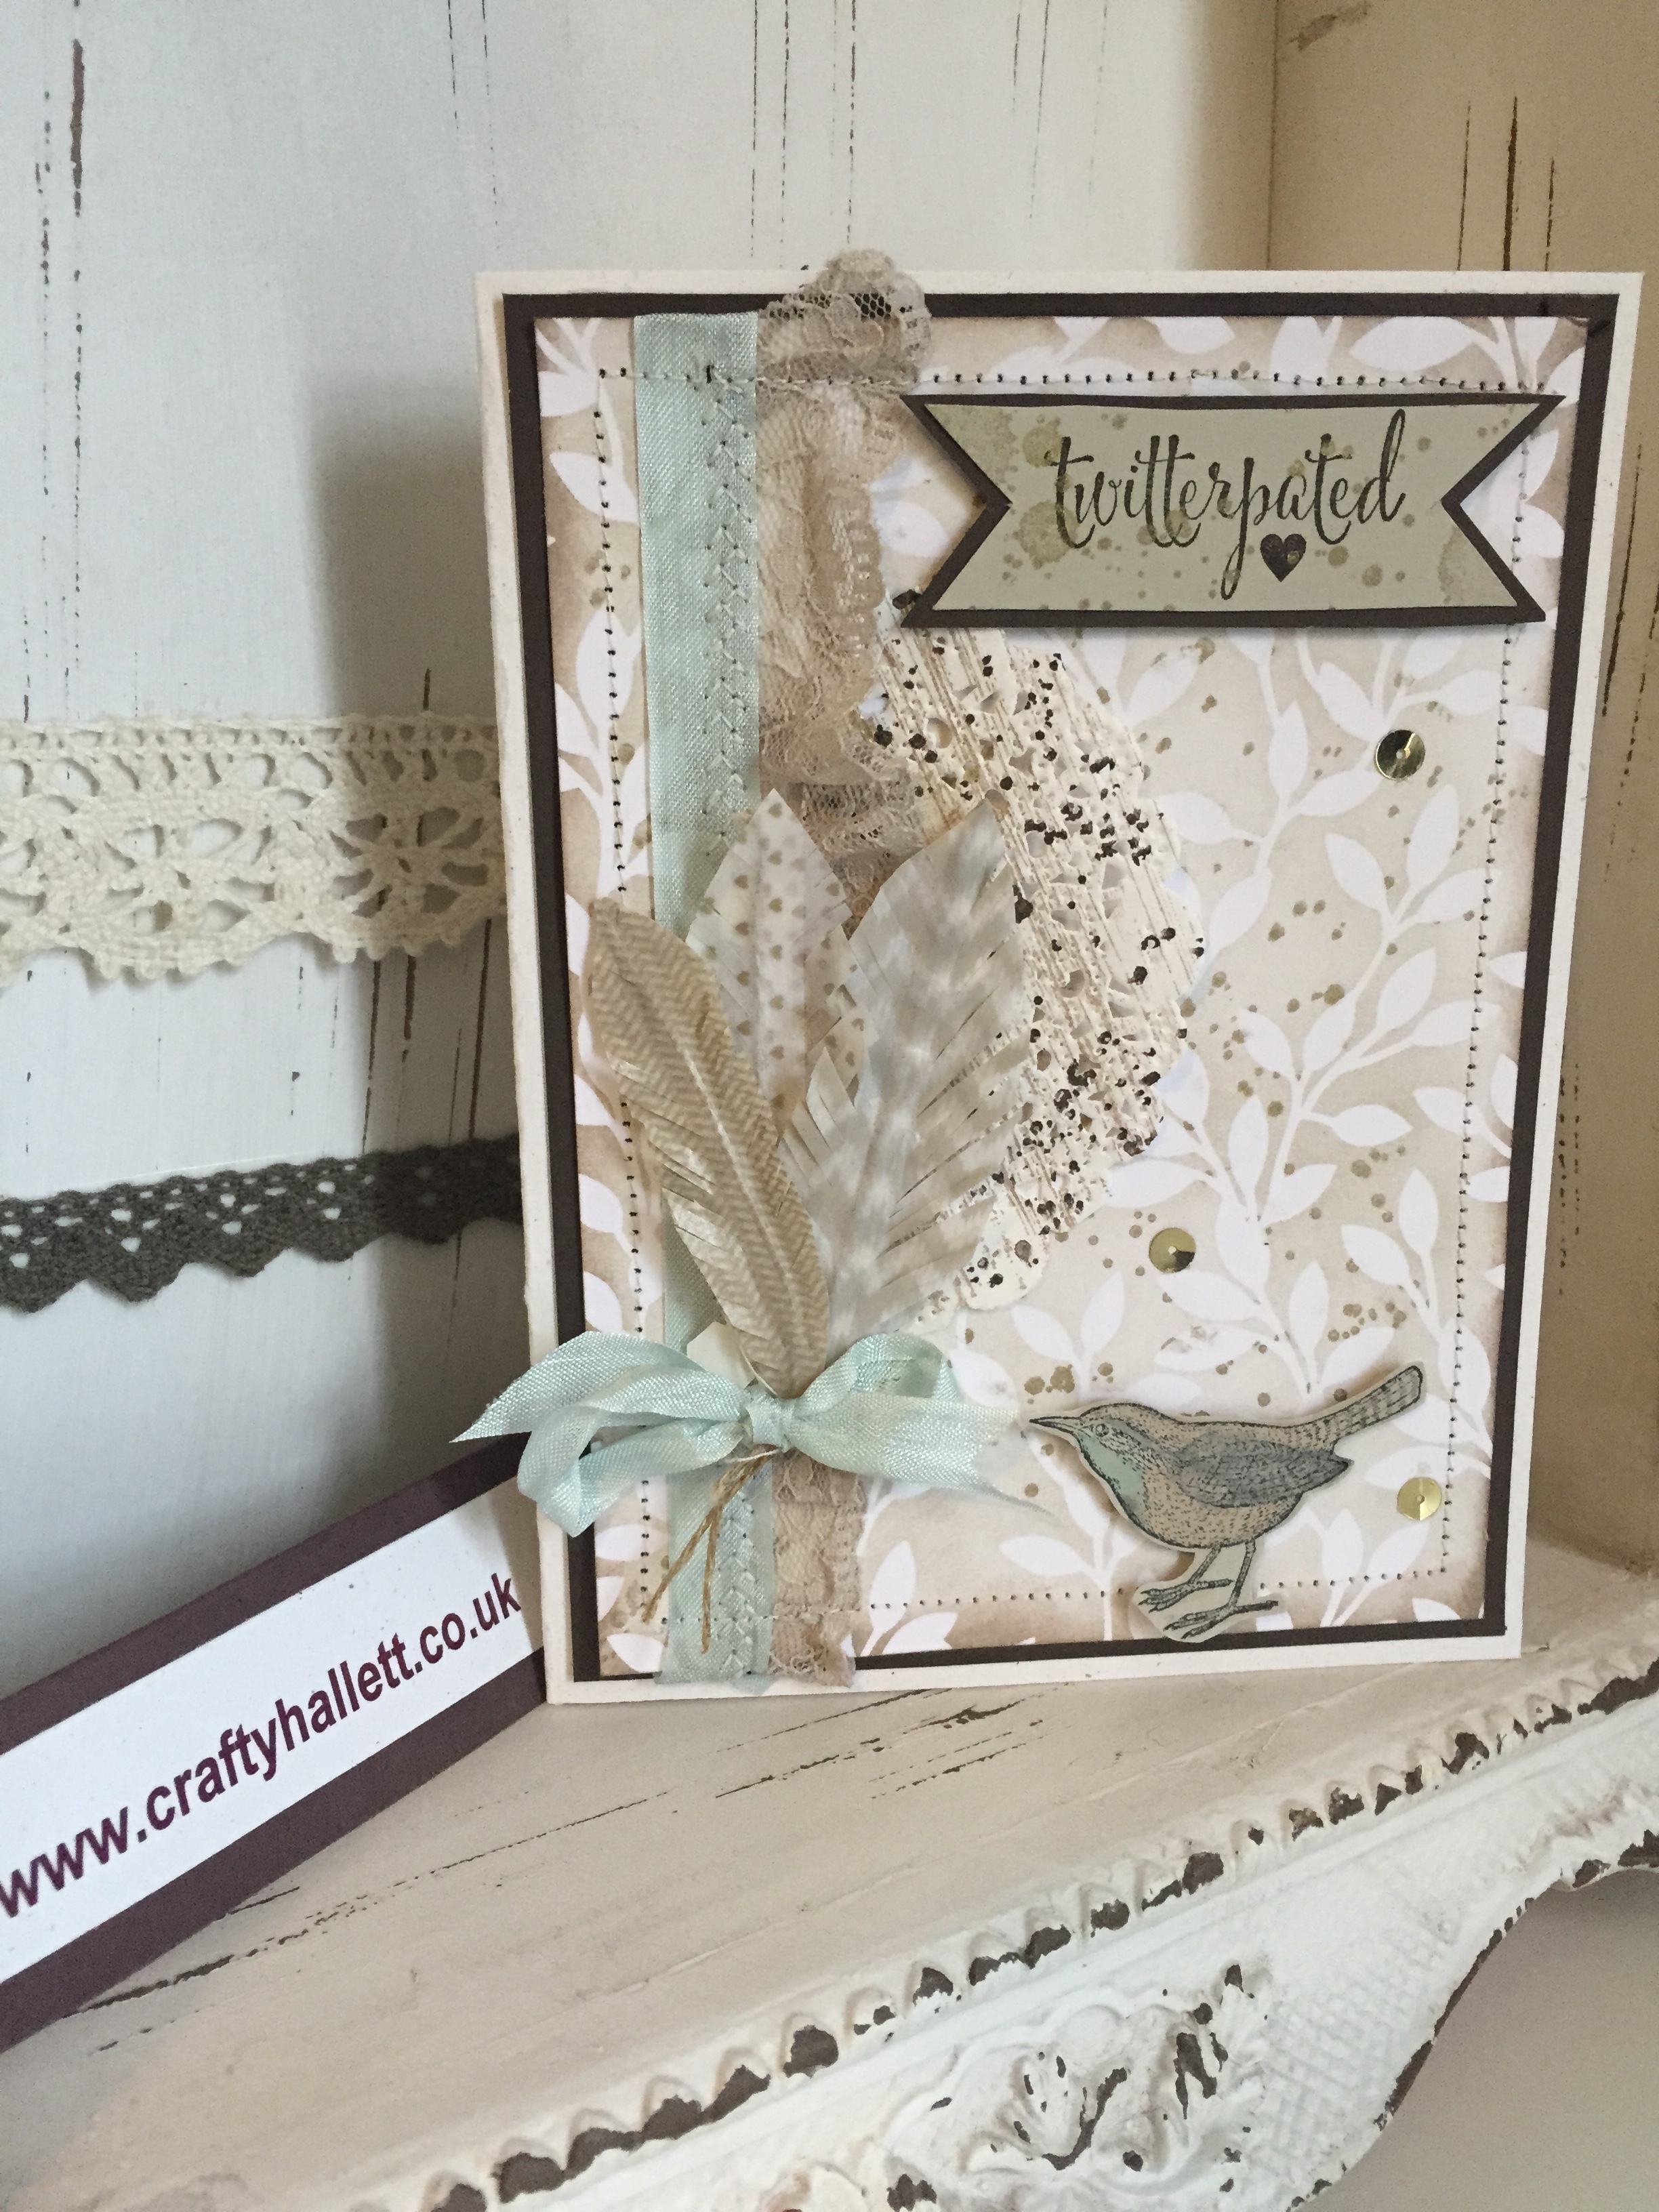
I used the fabulous Irresistibly Yours Designer Paper which is free at the moment, when you spend £45 or more on an order.  I inked it up with Sahara Sand ink, and it resists it beautifully.  A quick wipe with a tissue, and then a few splats of gold ink using the old favourite Gorgeous Grunge stamp set completed the base layer which I stitched using the sewing machine to a mat of Chocolate Chip.  The sahara sand  lace is so pretty I gathered it up under a layer of Soft Sky Satin Seam Binding, and then did a bit of fancy stitching with the sewing machine.  The Doillie also got some of the gorgeous grunge treatment.

The little bird is stamped on Sahara Sand and coloured using my blendabilities.  He is from the An Open Heart stamp set and is so pretty.

An open heart bird, twitterpaited

Some washi tape feathers were called for – three of them in muted crumb cake and Sahara sand colours tied with a little blue bow.

Fancy Stitching Seam Binding Ribbon

The sentiment is from the You and Me stamp set.

So there you have it – a valentines card doesn’t have to be pink or red, this is perfect for the men in your life, and just oozes romance and vintage lace

Hope you are having a good day.  And as a reminder we are half way through Saleabration – so if you want to indulge in some crafty purchases and get a free gift or two – check out the deals in my shop

Love Stampin’ Up! Simply Created Kits – Hello Life, Hello Valentines Day

Stampin' Up! Simply Created Kit

I love the kits that Stampin’ Up! have created for us in the Spring Summer Catalogue. – Click here to see the full range 

This Project LIfe Kit called Hello Life, was intended as a “new baby” kit, but I reworked it to be a Valentines Week gift to my husband Dan, (Valentines week in our house as we are such a pair of softees we love this annual excuse to be all lovey dovey and a have a week of treats to each other planned – more on that anon).

The kit was simple to use, and I have plenty of bits left over to make some cards with too.  It was easy to make the pompoms and all the other little bits following the instructions in the kit.

I used some of my existing stamp sets and phrases from the So You Stamp set, but added some from a retired set as well, using craft white ink on the blackboard card.

It was so much fun to make and dead simple.  The frame its on comes with the kit, and measures a massive 43 x 35 cms so its going to look quite impressive on the wall in the love room.

Hope you are all having a good week.  Oh and CHECK OUT THE BARGAINS, – the magnetic platform for the big shot is reduced in the weekly deals, but you only have till next Tuesday to order… so what ya waiting for!

Cx

Swallowtail Stamp from Stampin’ Up! has a New Framelit Friend!

What do you recon?  I combined the Swallowtail Stamp (a returning favourite HUGE stamp from the Annual catalogue – and the reason I joined Stampin up!) with the new Butterfly Framelits die and I got this

swallowtail, butterfly framelits, stampin up

I stamped the Swallowtail in Crumb Cake twice on to a piece of naturals white cardstock.  The first one became the card base, mounted on a mat and layer of Hello Honey Cardstock.  The second I cut with the largest framelit die in the new butterfly framelits set from Stampin Up! and layered this on top with a stampin’ dimensional.  The patterns on the card base are from the new stamp set Butterfly Basics in crumb cake and hello honey.   A little antique lace trim, and a piece of hello honey ribbon were secured using the cute little Stampin Up! Stapler and the sentiment is stamped in Black Stazon.

Its a really effective but quite simple to make card, and so much fun.  I used waxed paper to cut out the die cut as its fairly intricate and it slipped out of the die a treat… which was good as you should come back tomorrow and see why I chose to cut out over 100 of the little blighters.  One of my lovely SU demo buddies really doesnt like the “freaky butterfly” so I almost decided to have a butterfly week and name it in her honour, but I think I will spare her blushes for now….

If you would like more details on the products used, clicky click click on the little pictures below.  And please dont forget if you want to order the stamp set and framelits buy the bundle and save 15%, and also if your spend is near £40 make sure it goes over £45 before postage and you qualify for a free saleabration item too – I would hate for you to miss out!

Cxxx

Stampin’ Up! UK CraftyHallett’s Desk Organiser

So I wanted a little organisation for my desk.  I kept loosing my note book and calculator.  Two very important things when you go to parties or card classes, and they just kept disappearing under a mountain of ink pads and stamp sets.  So it was time for a little organisation – and I came up with this

2014-11-30 12.00.36

Its perfect for what I needed.  A note book, pen, and calculator all safe in their own little folder.  And I thought how useful for other stampin’ up demos, so I cut 8 kits out with some instructions and gifted them to my  Stampin’ Up! Demo buddies when we got together last weekend.

If you would like the instructions to make this – click the link here ——> Instructions for Crafty Hallett Desk Tidy

If you make one please leave me a comment and let me know how you get on

Hope you are having a nice time and getting ready for Christmas.  Just a reminder the last order date for guaranteed Christmas Delivery is fast approaching – you have just 5 days left so please do get those last minute orders in.

Lots of love
Craftyhallett  xx

It’s A CraftyHallett Stampin’ Up Christmas Week – Day 1

Follow my blog with Bloglovin

Every day this week I will be blogging a Christmas Card, packaging, gift or decoration idea.  So lets stop waffling and start with today’s project. 2014-11-30 12.14.05 This is a snowflake sparkle card.  The card, using only one Stampin’ Up! Colour – Island Indigo, has been cut using the Snowflake Card Thinlets Die and stamped with images from the LetterPress Winter Stamp Set and a sentiment from the Good Greetings set.  A couple of snowflakes are cut from Silver Glimmer Paper and a little DSP is from the All Is Calm Speciality Paper Set. There is a video from Stampin’ Up here which shows you how to use the die and to use the die to cut the snowflakes http://youtu.be/feQESSKQnfw Everything you need to create this card is listed below – click on the pictures to be taken automagically to my shop so you can check them out for yourself.  Hope you have a great week and please pop back tomorrow for another project. PS. Big Reminder:-  You only have one more day to take advantage of the great starter kit offer – pay £74.25 and get £130 worth of product – a fantastic christmas present to you from Stampin’ Up!  Click here for more details 

Boys Birthday Card from Crafty Hallett

Just a quick post to share with you a card I made last week for my Son’s 24th Birthday.

2014-11-12 22.19.28

I used a number of stamp sets for the card.  Starburst Sayings for the “Happy Day” and “You make the World a Better Place”, Sassy Salutations for the Happy Birthday Sentiment and the Larger Than Life Alphabet stamps to do the Number 24.

2014-11-12 22.18.082014-11-12 22.18.30 2014-11-12 22.18.15

The background paper is from the lightweight “Typeset” stack and I used the Stars Mask to sponge stars in Lost Lagoon ink to tie in with the ribbon on the card.  A little twine and a mini staple and I was done.

All the items used to make this card are available from my shop – clicky click the pictures below to be taken automagically to my shop.

Bokeh Technique from Stampin’ Up! Demonstrator Caroline Hallett

I just love the big sentiments that are in the Bravo stamp set – but they are a bit of a challenge as they are so BIG.  They ideally just need to be on a pretty piece of DSP or a back ground all on their own.  Which is what led me to this technique – BOKEH.  I want to keep singing that song, you know Oh, the Okey Cokey – but as Oh the Okey Bokeh!

Bokey

Its a watercolour technique and you do need watercolour paper to get it to work.  The details are all in the video.  Only thing I can recommend on top is GIVE IT TIME TO DRY.  White craft ink takes an AGE to dry translucent.

Also after I had completed these cards, and you didnt see it on the video, I gave them a quick spritz with Vanilla Shimmer Smooch just for a little more SPARKLE

Please enjoy the video and making your own versions of these cards – they are so quick and easy and a little bit addictive.

Hope you all had a nice weekend.
Craftyhallett xxx

Mini Luggage Collection by Stampin’ Up! UK Demonstrator Caroline Hallett

Hi there

2014-08-03 19.27.45 2014-08-03 19.23.07 2014-08-03 19.23.04

Hope you love these cute little boxes I made a while ago. I promised then that I would make a video for them, and then my video equipment broke so the video was put on hold.  Luckily I now have a new video set up – so loads more videos are now possible 🙂

Anywho… here’s the video – made with a 6×6 square

I hope you enjoy making your own little boxes.  I am off to build IKEA furniture now with Hubby… wish me luck!

Craftyhallett Classes – Final Dates to get your Stampin’ Up! Fix for 2014

As we draw ever closer to the seasons festive end, just thought I would share my upcoming class dates with you.
Friday 28th November –  Christmas Projects 3    Folkestone    7-9.30pm
Saturday 29th November – Beginners – Canterbury – 10am-12noon
LAST CLASS OF THE YEAR :  when Santa Stampin’ Up! might pay a visit…. Monday 15th December, Folkestone 7pm – 9.30pm

LAST ORDER DATE FOR CHRISTMAS is Monday 15th December.

I will then be taking a little crafty break to enjoy Christmas with the family, and back for my first class of  2015 on Saturday 10th January in Canterbury, Tuesday 13th January in Folkestone.

Please email or phone to book in as spaces are limited

Here are some photos from our past classes in the last year – just sharing the sort of things we get up to – if you have not been why not join us – we are a friendly bunch


So that’s all from me today – but don’t forget if you would like to have a free crafting party at home please give me a shout – more details of how to host a party and the free stuff you get are on my website

CraftyHallett Reward Day!

Oh its my favourite day of the year – craftyhallett reward day.  Save your diaries, for ….. Saturday 24th January from 10am until 4pm  – a whole day of crafting with friends.

Crafty Reward Day  this year is at  St George’s Church Hall, 8 Audley Road, Folkestone CT20 3QA.

This event was such fun last year – a whole day with friends, old and new.  Crafting, chatting and mainly laughing.  So why not do it again!

You will get to make 5 different projects with 5 different Stampin’ Up! Demos.  Lorraine, Sandra, Sally, Sharon and I have each prepared something fun to share with you, all you need to bring is yourself, a packed lunch and some cash for a raffle as you might win an awesome prize or two. And did I mention table gifts and spot prizes?

Here’s a few photos from last year to whet your appetite


The day is free to customers who spend a total of £50 or more in November & December.  If you are not a customer of mine and would like to attend the cost will be £20.   Do hope to see you there.

PLEASE RSVP by EMAIL TO MRSCAROLINEHALLETT@GMAIL.COM or TEXT/CALL  07545 968127 NOT LATER THAN 19th JANUARY TO SECURE YOUR SPACE AND ENSURE WE CATER FOR THE RIGHT NUMBERS THANK YOU


Advent Calendar using Stampin’ Up! UK’s Nifty little Boxes

Stampin up have brought out a great set of little boxes and a stamp set to make this cool advent calendar.

2014-11-08 18.44.03

The boxes fold flat and need no glue to keep them closed.  The box is a 2 inch cube so perfect for your own chocolates or perhaps a poem or a riddle?  I punched the circles out from Pear Pizazz and Soft Sky cardstock and then stamped them using the 25 Days Stamp set.  Such a versatile set that is not just for christmas advent calendars – oh no this is the set that just keeps on giving.  How about using this set for

Thank you gifts, first day of school photos, birthday cards, border & backgrounds, labels, graduation cards, party favours, 25 reasons why you love your other half, anniversary cards and gifts, countdowns to a wedding, list of your favourite things, project life and scrapbooking, check lists, banners, clue for a treasure hunts and so much more…

IMG_0640

The boxes are just £6.25 for 25 – click on the pictures below to buy them automagically from my shop.  Such good value even if you didnt want to make an advent calendar with them, perhaps gifts for the table on christmas day, or just little treat boxes.

Come back tomorrow to see the “alternative” advent calendar I have made using the same stamp set but some different ideas for boxes.

Lots of love

Crafty Hallett

Wedding Card & Gift Box using Project Life Kit from Stampin’ Up! UK

2014-10-26 09.46.43

Today I am sharing with you a card and envelope I made for my friend’s wedding.  Their colour theme was deepest purple so I was able to use as a colour match Rich Razzleberry.  I used the cards from the Love Story Project Life Kit to create a bunting string with pictures of the happy couple, a shaker heart with star confetti and an envelope containing the gift (cash) we had for them.  I have shared some photographs below so you can see each part of it.

2014-10-25 10.56.30 2014-10-25 10.56.01 2014-10-25 10.55.50 2014-10-25 10.55.37 2014-10-25 10.55.19 2014-10-25 10.55.05

The project life cards are perfect for this project – and a few stamps from Big News and other sets completed the look!

I hope the bride and groom liked it.  We had a lovely day with them.  Here’s me and the man getting in the mood ourselves

2014-10-25 12.42.15

Hope you have all had a great weekend.  Click on the pictures below of the products I used in this card to be taken automagically to the shop if there’s anything there that takes your fancy.

Have a great week!

Caroline xxx

Stampin’ Up! UK’s Many Merry Stars Kit – opening the bag

Merry and Bright

So when Pam Morgan demonstrated these kits at convention and I saw the size of the big star I just knew I needed this kit!  And what’s more I knew I wanted to make them with my crafty gals.

Its been a long week waiting for Mr UPS to deliver them, so when I got in from work this evening I couldn’t wait to get started.  I thought I would video this occasion so you could share the excitement with me!  Have you got your kit yet – at £23.99 they are great value and you get a LOT.

Video is here

you will have to excuse the bloopers, I was learning as I went along, and as we are off at a fabulous wedding all day tomorrow I could not wait for better light – so its not ideal but its there 🙂

Just got 25 more stars to go – which is perfect for an Advent calendar so I shall be filing mine with treats for each day leading up to the BIG star for the final day.

If you want one of these for yourself then please visit my webshop – and hurry as these are only available whilst stocks last – and they are very popular already, why not get a couple they make great presents for keeping the kids busy in the run up to Christmas – as another idea perhaps make them with the kids pictures or wishes inside, seal them up and then use them as decorations for the next few years – then when the kids are grown up open the stars and read what their 5/6/10 year old selves were excited about!  Or if you do craft fairs buy some to sell

Hope you all have a lovely weekend.   Oh and 1 week on I still havent come out of my SU Convention bubble… and I am planning my next one 🙂

Stampin’ Up! European Convention Wrap Up – warning long post

Well…. let me tell you Stampin Up sure do know how to throw a party – and in the words of S Club 7 – “aint no party like a SU party”

Where do I start… oh lets start with the freebies shall we?  The first photo is all the free stuff they gave us just for being awesome and presents from my uplines Michelle Last and Jenny McCormack.

IMG_6908

These are the swaps that I received from other demos from all over Europe – so much inspiration

IMG_6814

All of the speakers and presenters were amazing, inspiring and so much fun.  I loved the last one most of all – Shelli showed us what cards she was making for her at home parties.  I was so impressed at how welcoming and approachable she and her husband were.  I saw her literally having her photo taken with hundreds of people, and she was always kind, interested in what they had to say and of course that million dollar smile.  I have to say I was a bit star struck when I first saw her at the Silver 2 /Managers Reception

Photo Bomb

The next four pictures show me up on stage during my presentation – I was so nervous, and one or two little “mouth operating independently of my brain” moments happened, but thankfully everyone (apart from the translators) thought it fun!  The next photo is me with my dutch name sake – Caro Van der Straaten – who is just so much fun, and we are already plotting when we will next get together.

caroline and brandi Caroline Team three monkeys

The team photo in the Gold Hall is with the lovely Jenny McCormack – my uplines upline, and the rest of her team of lovely ladies – it was so nice getting to know them in person – it really is the friendships and support that make convention.  Which brings me on to the last picture – the three monkeys pose.  Lizy and Paula are just such lovely ladies, clever and talented demonstrators who are so supportive and funny to spend time with – they looked after me at my first convention last year and again at Telford in May, and here we are at Belgium.  Until the next time ladies xxx

Here is a link to the official SU video from the event – I am laughing with Brandi and Paula at about 1.51 in just after my rehearsal


Michelle

Also got to spend some time with Michelle Last, she is such an inspirational leader – and a lovely lady

There were some people who couldn’t be at convention this year – my sweet friend Elaine from Papercraft button is one and also my team mates – who are so coming next year!

This is the “convention at home kit” I sent Elaine so she could get a taste of what she was missing 🙂

Papercraft button

If you want to be at Convention in Brussels next year – then join my team and you can – email me for more details or click the buy a starter kit button

So that’s enough waffling on a Monday for me – catch you later with some amazing STARS for Christmas I am just dying to make – the new mini mini catalogue launched today – visit the shop and see all the loveliness for yourself – and if you hold a party with me in November I will show you how to make these

Advent

Book a Party and Earn Free Stamps!

Party Bookings


Parties are so much fun – they are a really fun way to get to play with crafting supplies, learn to make cute cards and gifts and enjoy a stress free evening with friends.

If you have ever wondered what happens at a party – have a look at this blog post from last year – it was a round up of a fun party I had at Sandi’s house.  Sandi has since joined my team of demonstrators!  I am always happy to do a party – and have a variety of date/time options.

Until October 31st we also have a great promotion on – in addition to the free hostess ££££££ you can spend on anything you want from the catalogue you can also get this great free stamp set – see the details above.

To book a party just leave a comment, give me a call on 07545 968127 or send me an email at mrscarolinehallett@gmail.com – and lets make a date to make something that means something.

Lots of love


Caroline xxx

Exciting Class Tomorrow – Stampin’ Up! Flower Patch is here

I am so excited to share with you today my class samples for tomorrow nights class


Class 1 picture Class 2 pictureThe first photo graph is of a simple gift bag, made from a single A4 sheet of card and stamped in Craft White ink with the new Another Thank You Stamp set from Stampin’ Up!  I have then made a flower using the Bigz Flower Frenzy Die – 2 of the large flower, 2 of the medium flower and 2 of the smaller flower, shaped and moulded to form a simple flower to decorate the bag.  A little trimming with ribbon and satin seam binding handles and we are good to go!

The next thing we are making – I hope the ladies are concentrating! LOL is a set of notelets measuring 3 x 3 inches, stamped with the GORGEOUS Flower Patch stamp set – a bargain of a set with matching framelits to help you cut it out really easily.   They are in a little box, stamped with the hardwood background stamp (cannot get enough of that stamp) and then one of the Tag Talk tag stamps to finish it off.  It would make a lovely gift for a friend its so bright and cheerful and summery.  If you want to buy any of the stamps etc to make this set then please just click on the pictures below to be taken automagically to my shop.

Looking forward to seeing the ladies tomorrow night, and then after that going down to take part in the Torchlight procession from the new memorial arch in Folkestone, down the Road of Rememberance and off for a minutes silent at the old Folkestone Harbour Station to remember those lost in World War 1 and mark the start of that awful war that changed Britain forever.

Hope you all have a good week.

Love Caroline

Making something that means something.In my spare time I am proud to be a Stampin’ Up! UK Independent Demonstrator.  If you would like to Join Stampin’ Up! UK and my team, please click the join my team button to the right – or at the top of the page click to buy a starter kit.  And if you enjoy learning new things, I have a YouTube channel – click the link on the right – or search for Craftyhallett Independent Stampin’ Up! UK demonstrator.

 If you would like to buy any Stampin’ Up! products online please click on the link to the top right.  We have everything you need to make your own handmade cards, gifts, project Life scrapbooking and much more. 


Happily Ever After for Alfie and Anna

Today I am sharing with you a very special card I made for the wedding of a dear sweet friends’ daughter Anna


2014-07-13 20.57.10

I started by using a piece of the DSP from the All Abloom stack and distressing the edges with inks and stamping a few hearts.  I then added some torn typeset DSP – its a great paper, thinner than the usual papers, and great for altered art projects.  Using a new mask from Stampin’ Up!  I sponged real red hearts and then layered this on top with a doily wrapped around the edge.  The ribbon is crumb cake seam binding together with Real Red Cotton ribbon – its so beautifully soft and drapes really well.  The huge sentiment is from Big News, cut out on a label framelit.  I also used the matching sentiment from this stamp set for the inside stamped in crumb cake

2014-07-13 20.40.03

I made an envelope on the punch board using the specialty love heart velum and then used a real red card belly band to close, with a layered up stamp from the Tag Talk  stamp set.

Any of the products used to make this card can be bought online – click on the pictures below to be taken automagically to my Stampin’ Up! shop.


Thanks for visiting, lots of love

Caroline  xxx

Making something that means something.

In my spare time I am proud to be a Stampin’ Up! UK Independent Demonstrator.  If you would like to Join Stampin’ Up! UK and my team, please click the join my team button to the right – or at the top of the page click to buy a starter kit.

And if you enjoy learning new things, I have a YouTube channel – click the link on the right – or search for Craftyhallett Independent Stampin’ Up! UK demonstrator.

If you would like to buy any Stampin’ Up! products online please click on the link to the top right.  We have everything you need to make your own handmade cards, gifts, project Life scrapbooking and much more.


I Like You Blendablities from Stampin’ Up!

2014-07-13 21.00.05


Today’s card is a little something I made for one of my friends who is a birthday “twin” – we share the same birthday.  I used the lovely new stamp set called I Like You  – its a great little set – free if you hold a qualifying party – and perfect for colouring in with the new Blendablities Alcohol markers or alternatively any of our stampin up inks.  I have used new ribbon to match – tying two bows to symbolise the two birthdays on the same day… and the lovely green/blue paper behind is from the All Abloom DSP paper stack – great value at just £6.95 for 40 plus card front sized double sided sheets

Colours used are Rich Razzleberry and Daffodil Delight and the sentiment on the inside is from the new Big News Set


Thanks for visiting, lots of love

Caroline  xxx


Making something that means something.


In my spare time I am proud to be a Stampin’ Up! UK Independent Demonstrator.  If you would like to Join Stampin’ Up! UK and my team, please click the join my team button to the right – or at the top of the page click to buy a starter kit. 

And if you enjoy learning new things, I have a YouTube channel – click the link on the right – or search for Craftyhallett Independent Stampin’ Up! UK demonstrator.

 If you would like to buy any Stampin’ Up! products online please click on the link to the top right.  We have everything you need to make your own handmade cards, gifts, project Life scrapbooking and much more.


Cupcakes for my Birthday! Stampin’ Up! presents for you

Hello and happy birthday to me!

Another year older, wiser and happier.    Today I have a little video tutorial for you for one of my favourite projects – I love to make these cupcake candle holders, and wanted to bring it bang up to date with new stamps and papers from the All Abloom paper stack – just £6.25 for 40 sheets of 11.4 x 16.5 cm sheets – order it here 

2014-07-14 10.59.58


They are really fun to make – the tutorial has all the details you need.


FREE DIAMONDS OR PEARLS

As its my birthday – here is a present for any customers placing an order this week, between today and 21st July, either online or in person.   I will be giving away free DIAMONDS and PEARLS from Stampin’ Up – worth £4.50 each they are just lovely to us – and we all need a bit of bling in our lives .  So all you have to do to get your free pack of either Diamonds or Pearls is CLICK to visit the shop and place an order, or email me.  This gift is coming from me, so will be in your thank you card with your order, or in the post if you order online.


Thanks for visiting, lots of love

Caroline  xxx


Making something that means something.


In my spare time I am proud to be a Stampin’ Up! UK Independent Demonstrator.  If you would like to Join Stampin’ Up! UK and my team, please click the join my team button to the right – or at the top of the page click to buy a starter kit. 

And if you enjoy learning new things, I have a YouTube channel – click the link on the right – or search for Craftyhallett Independent Stampin’ Up! UK demonstrator.

 If you would like to buy any Stampin’ Up! products online please click on the link to the top right.  We have everything you need to make your own handmade cards, gifts, project Life scrapbooking and much more.


Stampin’ Up! UK’s Swallowtail Stamp and Blendabilities

butterfly

I have to say I am loving the new Blendabilities Alcohol markers from Stampin’ Up!

I stamped this swallow tail on Velum – using Momento Ink – recommended for use with the Blendabilities.

Once it had dried I then coloured it with the three shades of coastal cabana from the pens, and added little accents with the white chalk marker.

Then once i had cut round the image I applied some Crystal Effects glue to help the butterfly curl – and sprinkled on a little dazzling diamonds to make it shimmer.

Once it was dry I mounted it on Whisper White card stock, and stamped in Smoky Slate another copy of the Swallowtail stamp so that it looked like  a shaddow.  A simple mat of Coastal Cabana card stock completes the work, and now I just am looking for a nice picture frame to put it in and its going on my office wall.

If you would like to buy any of the items featured on my blog – click the button to be auto magically transported to my online shop

button

Hope you are having a good week

Best wishes

Caroline

Caroline


Magic Slider Cards

Hi all

I saw one of these magic slider cards on a facebook group and knew I wanted to make one of my own.  Unfortunately the picture didnt have a tutorial or measurements with it, so I did a bit of googling and found something similar, and then ended up making my own up anyway!

Magic


The card base used is Melon Mambo – cut at 5 inches x 6 1/4 inches – scored at 3 and 6 inches on the longer side.  On the first flap I punched out a 2 inch wide circle using my circles framelits.  the tag is cut using whisper white which I then stamped on the flower from the so very grateful set in stayzon.  Its coloured in with Melon Mambo inks and Old Olive.  You also stamp another version in stayzon on acetate window sheets – these are then tied together, and inserted into the magic pocket – made from a piece of whisper white glued just on the long sides et voila – One side of the tag (the acetate sits on top of the pocket and the coloured in tag sits underneath.

I found these instructions helpful to get the general idea from http://juliedavison.blogspot.co.uk/2009/10/magic-card-tutorial.html

The sentiment is also from the same stamp set – and SHOCK HORROR – it is NO LONGER available after 1st July so if you want it – clickitty click click the link below and order it before it disappears.

Hope you find this useful and are enjoying your weekend.  Pop back later in the week for another tutorial – this time on FAUX leather notebooks using the lovely Ex-Libris stamp set…

Less is More – One Layer Thank You

I love the Less is More Blog – it always has such a great load of people contributing to it each week, and if ever I am stuck for an idea or Mr Mojo has taken a hike I find something there to get me back at my craft table creating.

This week’s challenge is one layer thank you cards

I really love the Stippled Blossoms set from Stampin Up! and I usually use it for fairly complex fussy cards with lots and lots of layers, ribbons and dimensions, so I thought it would be fun to try and use the set as a one layer

I started with a Naturals White card base  and masked off an area using post it notes – like this


2014-05-10 17.11.16


Then using Wisteria Wonder and Elegant Eggplant as my two colours for the flowers and Wild Wasabi and Garden Green as the two colours for the leaves I started stamping flowers randomly on and off the masked layers.

I then used the Thank You sentiment from the Happy Watercolour set in Black Stayzon – and then took my Marker pens in Elegant Egg Plant and Wild Wasabi and drew two parallel lines down the card to finish off and create the illusion of a layer.

2014-05-10 17.42.08

I am slightly just a little bit sad that this stamp set is on the Retired List and will only be available until the end of June, but hey ho – I have my set and will cherish it for many years to come as its so pretty – and now I have proved that I can do simple one layer cards or vintage over the top fussy ones with it!


Petite Petal Punch – Still on Backorder

20140123-001925.jpg

It’s cards like this one that have caused the Petite Petal Punch to be so popular WORLDWIDE that Stampin Up! have had a serious backorder problem with them for the past 3 months – as soon as they get some in, they sell out again.  I appreciate it has been a very frustrating time for some of my ladies who are still waiting on orders from March and April.

I can only apologize that its taken so long, and reassure you that everyone is doing their best to get more manufactured as quickly as possible and back in the warehouse in Frankfurt so that they can be sent to you.

I think I have spoken to everyone who is patiently waiting and I can only reassure you that we are doing all we can

Grab em while they are STILL HERE!

Very soon we will be getting the retired list of stamps for the UK, hopefully by the end of the month.

I am having a RETIREMENT PARTY – We will be making 4 projects with some of the retiring stamps, cardstocks and designer scrapbook paper and any of my local customers and friends are invited!.  The Party is outside of my usual class schedule – so to come just email me on mrscarolinehallett@gmail.com.  Details Are below


When:- Thursday 22nd May 2014
Time: 7pm-9pm
Where:  CraftyHallett HQ – Folkestone
Cost – FREE but there are only 8 spaces so book to make sure you can come play…..

In the meantime – a little bird tells me that the retiring in colour sets are always the first things to sell out – so if you want any of these you had better order now rather than be disappointed – as once they are gone, they are gone.

In Colours


I have stocked up on the Ink Refill so I know my ink pad will be good to go for some time yet.  I am also adding the in colour coredinations 12 x 12 sheets as they work out so reasonable.

Click on the picture to buy


Spiral Spins for Making A Point to Have a Party!

2014-05-05 19.35.58

Whilst I was visiting Brian’s website yesterday I spied this rather marvellous card… 

I have had the Making a Point stamp set for months and never once got it inky (its one of the seasonal Occasions Hostess Sets) – so this was a perfect card to get at least one of them out of the box before we have to say good bye to them.  The Spiral Spins are lovely stamped in Tempting Turquoise, Pumpkin Pie and Melon Mambo and they just POPpitty POP POP off the page.

If you want the Making a Point Stamp Set you will have to be quick – we only have until 30th June before it retires – so GET IN TOUCH if you would like to host a party – and this set could be yours for FREE – just fill in the form at the end of this post

Making a point


Thxs, Thxs, Thxs for Other Stampin’ Up! Demonstrators and Sons that cook dinner

You know how it is – sometimes as a crafter you sit down with a type of card that you “have” to make and the ideas just dont come.  Usually when that happens I just play with what I have until I am happy, or I take a walk through Pinterest or SplitCoast Stampers until I see something pretty and then I CASE it.  What’s CASE?  Copy and Share Everything!  As long as  when you publish it on facebook or pinterest or your blog you credit the demo its perfectly OK, and helps to get you through those moments when you just are stumped with what to do for a particular stamp set or card.

Here is a sweet little thank you card which I CASEd from Brian King – who is a rather amazing American Stampin Up Demo – he comes up with some beautiful cards – have a visit to his website .  His card originally had 4 sets of words in Ombre style and the word was Yay!  I decided to make mine as a thank you card for my son who has invited us to dinner this week – so its a perfect “young persons” card with Thxs (short hand for thank you – or so I am told!)

So THXs to Brian for the Idea and THXs to Sam for cooking for me and darling hubby x

Hope you are having a lovely week.  Lots of love  Caroline xx2014-05-05 19.36.14

Hello Sailor Meets the World Map and Flips for Thinlits Frames!

2014-05-05 19.38.55Here is a card I have made using exclusively Stampin’ Up! products.  To start I cut a piece of Night of Navy A4 card stock to measure 5 1/2 inches x 8 inches.  This I passed through the big shot using the Thinlets Frame Label Card, with the extra portion at the end poking up so as I have a third fold.

Then I used the Hello Sailor stamp sets stamping in Night of Navy Ink and Soft Suede.  The world map was stamped in soft suede and passed through the die cutter again to make the panels, which I just trimmed to be 1/4 inch smaller all round.

This is a cute card for your husband, lover or friend – to buy any of the products used please clickky click click on the pictures below to be automagically transported to my website shop where you can purchase them and have them delivered by UPS for just £4.95 to your home – no matter how little or how big your order is – one flat fee… How lovely.


What a Lovely Weekend

What a Lovely Weekend

Here is a quick post of a card I made this weekend, its one of the cards we are making for our Card Class tomorrow night. I used marina mist designer scrapbook papers cut 1 inch wide x 5 inches long and layered on top a circle on which i stamped the bike from the Cycle Celebrations stamp set – I used a happy birthday sentiment to complete the card. SIMPLES.

Wishing you all a good week – check back tomorrow and all this week to see the other cards I made.

Project Life Digital Downloads Now Available From Stampin’ Up! UK

As you know Stampin Up! announced a new partnership with Becky Higgins and Project Life.

We are excited to let you know that the first release of Stampin’ Up! Project Life products will be digital downloads—starting today!

The Point & Click (137347) and Day to Day (137348) Project Life Stamp Brush Sets and Everyday Adventure Project Life Cards (137345) are now available.

MDS_DWNLDA_EVERYDAY_ADVENTURE_PROJECT_LIFE_3X4_CARDS_rdax_574x574

CLICK HERE TO DOWNLOAD THESE HERE 

These downloads (American English-only) correspond to traditional Project Life products and are compatible with our MDS design software and other design and photo editing programs.

New to digital design? Here are some of the perks:

  • With just a few clicks on your computer, you can print your cards from home and add them to your projects.
  • Digital downloads are a great companion to the traditional products because you’ll never run out of cards.
  • Add stamps to your photos to create stunning overlays before you get them printed.
  • Create custom cards by recoloring and resizing the embellishments and stamps.

The possibilities are endless!

If you don’t have MDS – Stampin’ Up’s Fun Digital programme you can download it for FREE here as a 30 day trial – or you can buy the full version for just £13.95

On July 1st you will be able to buy a whole new range of albums, sheet protectors, small 100 card starter packs and much much more – eeeekkkk- I cannot wait

Photopolymer stamps for FREE!

Great news – spend £60 and you could be one of the first in the UK to get your hands on Stampin’ Up! new poly stamps

olo_photopolymer_5.1.2014_UK

I am excited to announce the release of our new Stampin’ Up! photopolymer stamp sets! Photopolymer stamp sets are transparent stamps that can be placed on Stampin’ Up!’s regular acrylic blocks, and the transparent nature of these sets makes it easier to line up what you are stamping without the need of a guide.

From 1 May until 31 May, you can earn a free set for every order of £60 worth of other products

Click here to buy them if you cant wait to add them to your order


No 1 No 2 No 3 No 4


Lots of love

Caroline